Staining your deck can give it a fresh and updated look while also protecting it from the elements. However, proper preparation is key to achieving a long-lasting and even finish. In this guide, we will walk you through the essential steps to prepare your deck for staining and ensure that your efforts pay off in the end.
Key Takeaways:
- Thoroughly clean your deck surface before proceeding with any other steps.
- Assess the condition of your deck and make necessary repairs before staining.
- Cover surrounding areas and furniture to protect from accidental staining.
- Choose the appropriate stain and application method for your deck type and personal preferences.
- Proper preparation of your deck will ensure a beautiful and long-lasting finish.
Assessing the Condition of Your Deck
Properly assessing the condition of your deck is essential before starting the preparation process. A thorough inspection will help you identify any damages, rot, or loose boards that may need to be addressed before staining. Here are some tips on how to evaluate your deck:
- Check for any structural issues, such as rotting or warped boards
- Look for loose nails or screws that need to be tightened or replaced
- Test the strength and stability of the railing
- Examine the surface of the deck for any cracks, holes, or discoloration
It’s important to address any issues before moving onto the preparation steps. Failure to do so can compromise the durability and appearance of the finished product. If you notice any significant damage or concerns with the structural integrity of your deck, consider hiring a professional to conduct additional inspections and repairs if necessary.
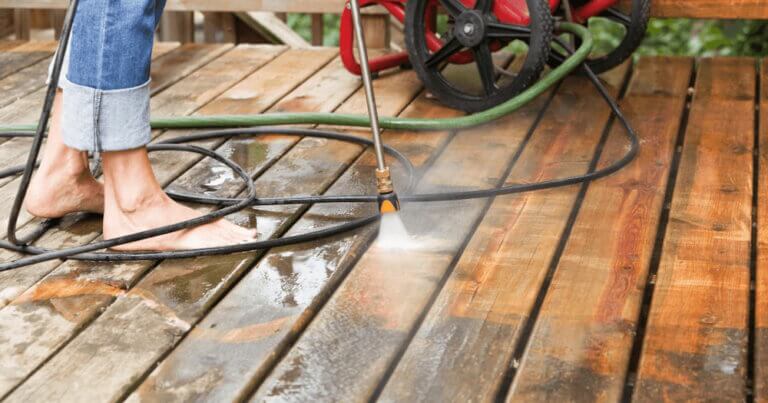
Cleaning and Removing Debris
A clean deck surface is crucial for proper stain adhesion, ensuring a smooth and even finish. To begin, remove all furniture and other objects from the deck. Next, clear the deck of any debris, such as fallen leaves, dirt, and grime. You can use a broom or leaf blower to minimize the amount of debris that remains and makes it easy to collect with a dustpan or vacuum.
If your deck is heavily soiled, you may need to power wash it to remove all the dirt and grime. Work in small sections, keep the pressure low, and avoid getting too close to the surface to prevent damage to the wood. Be sure to let the deck dry completely before moving on to the next step.
Pro Tip: Avoid using a bleach-based cleaner, as it can break down the fibers in the wood and cause discoloration.
Repairing Damaged Areas
If you notice any damaged or rotten deck boards, it’s crucial to repair or replace them before staining. Follow these simple steps to ensure a sturdy and stable deck surface:
- Assess the damage: Carefully inspect your deck for any boards that are showing signs of wear and tear, including signs of rot, mold, or mildew. Take note of any boards that need attention and measure their length and width for replacement.
- Remove the damaged boards: Using a saw, remove the damaged boards from the deck surface and dispose of them properly.
- Maintain structure: Check the underlying deck joists for any damage or rot and replace or repair them as necessary to ensure the integrity of the deck structure.
- Install replacement boards: Cut your replacement boards to the exact size and install them flush with the surrounding deck boards. If necessary, sand the surface of your newly installed boards to match the texture of the rest of the deck.
- Nail or screw in place: Once installed, secure your replacement boards by nailing or screwing them into place. Make sure that the nails or screws are sunk below the surface of the wood to prevent any tripping hazards or damage to your sander during preparation.
By following these simple steps, you can ensure that your deck surface is stable and free of defects. A smooth, even surface will make the staining process much more successful, resulting in a better-looking deck that will last for years to come.
Sanding the Deck Surface
Before applying stain to your deck, sanding the surface is crucial. Sanding removes any rough spots or splinters and creates a smooth surface for the stain to adhere to. Here are the steps to follow when sanding your deck:
- Begin by sweeping the deck to remove any loose dirt or debris.
- Use a power washer to remove any remaining dirt or stains.
- Allow the deck to dry completely before sanding.
- Depending on the condition of the deck, start sanding with a coarse-grit sandpaper, and then gradually work your way up to a fine-grit sandpaper.
- For best results, use a handheld orbital sander for smaller areas and a drum sander for larger areas.
- Sand in the direction of the wood grain to avoid causing damage or leaving marks.
- Once you have finished sanding, use a broom to sweep away any sawdust or debris.
It’s essential to take the proper safety precautions when sanding your deck, including wearing protective eyewear and a dust mask. Remember that sanding can be a time-consuming process, but it will ensure a better result in the end.
Applying a Deck Brightener or Cleaner
Before staining your deck, it is essential to brighten and clean the surface thoroughly. Applying a brightener can enhance the natural beauty of the wood, while a cleaner can remove any remaining stains or discoloration.
When choosing a deck brightener or cleaner, look for a product specifically designed for your type of wood. Some cleaners are designed for specific stains, such as mold or mildew, while others are more general purpose. Read the label carefully and choose a product that suits your needs.
Once you have selected the correct product, it is time to apply it. Start by sweeping the deck to remove any loose debris. Then, mix the brightener or cleaner according to the manufacturer’s instructions, and apply it evenly over the entire surface of the deck using a pump sprayer or a brush.
Leave the product on the surface for the recommended amount of time specified on the label, usually around 10-15 minutes. Then, using a stiff brush, scrub the surface in the direction of the grain to loosen any dirt or stains.
Finally, rinse the entire surface thoroughly with a hose or pressure washer, making sure to remove all traces of the cleaner or brightener. Allow the deck to dry completely before moving on to the next step in the staining process.
Protecting Surrounding Areas
When staining your deck, it’s important to take the necessary steps to protect surrounding areas from accidental stains. Follow these tips to ensure your deck staining project goes smoothly:
- Use plastic sheeting to cover any nearby plants or shrubs. Be sure to secure the sheeting in place with stakes or rocks to prevent it from flying away in the wind.
- Moving furniture or any other items away from your deck can also prevent accidental staining. If moving items is not an option, cover them with plastic sheeting as well.
- Use painter’s tape to cover any areas near the deck that you don’t want stained, such as the siding of your home or outdoor light fixtures.
- Wear protective clothing that you don’t mind getting dirty, including gloves, old shoes, and long sleeves.
By taking the time to protect the area surrounding your deck, you’ll ensure a clean and professional finish without any unwanted stains.
Choosing the Right Stain and Application Method
Now that you have prepped your deck for staining, it’s time to choose the right stain and application method to achieve a beautiful and long-lasting finish. Here are some factors to consider when selecting a deck stain:
- Opacity: Do you prefer a solid color or a more transparent stain that allows the natural wood grain to show through?
- Base: Choose between oil-based or water-based stains, depending on your personal preferences and the specific needs of your deck.
- Color: Deck stains come in a variety of shades, so choose one that complements your home’s exterior and matches your aesthetic preferences.
- Brand: Look for reputable brands known for producing high-quality deck stains that offer longevity and protection against the elements.
Once you’ve chosen your deck stain, it’s time to select the best application method. Here are some popular options:
- Brush: A brush is the most popular and versatile staining tool. It allows you to apply stain to smaller, harder-to-reach areas with precision.
- Sprayer: A sprayer is a quicker alternative to the brush, but it can be messier and may require more cleanup if not used correctly.
- Roller: A roller can apply stain to larger areas quickly and evenly, but it may not reach into tight corners or edges.
Consider the size, shape, and complexity of your deck when choosing the application method. A combination of tools may work best for different parts of your deck.
Conclusion
By following these simple steps, you can get your deck ready for staining. Proper preparation is key to achieving a flawless and long-lasting finish. Remember to assess your deck’s condition, clean and remove debris, repair any damage, sand the surface, and apply a brightener or cleaner. Don’t forget to protect surrounding areas before starting the staining process.
When it comes to choosing a stain, take your time and consider all factors, including the type of wood and your desired finish. Once you have selected the right product, use the appropriate tools and application method for the best results.
With a little effort and attention to detail, you can transform your outdoor space into a beautiful oasis. Now, sit back, relax, and enjoy your newly stained deck!
FAQ
How do I prepare my deck for staining?
To prep your deck for staining, follow these steps: assess the condition of your deck, clean and remove debris, repair any damaged areas, sand the deck surface, apply a brightener or cleaner, protect surrounding areas, and choose the right stain and application method. For detailed instructions, refer to the sections above.
Why is it important to assess the condition of my deck before staining?
Assessing the condition of your deck allows you to identify any damages, rot, or loose boards that may need repair before staining. It ensures a solid foundation and prolongs the lifespan of the stain. Refer to Section 2 for a detailed guide on assessing your deck’s condition.
How should I clean and remove debris from my deck?
Cleaning your deck is crucial for proper stain adhesion. Use a deck cleaner or a solution of warm water and mild detergent to remove dirt, grime, and debris. Scrub the surface with a brush or a pressure washer, then rinse thoroughly. Refer to Section 3 for more information on cleaning and debris removal.
What should I do if my deck has damaged areas?
If your deck has damaged or rotten boards, it’s important to repair them before staining. Replace any irreparable boards and fix loose ones. This ensures a sturdy and stable deck surface. Section 4 provides detailed instructions on repairing damaged areas of your deck.
Why should I sand the deck surface before staining?
Sanding the deck surface helps achieve a smooth and even finish. It removes any imperfections and allows the stain to penetrate the wood more effectively. Section 5 explains the process of sanding your deck boards and provides tips for a successful sanding experience.
Should I apply a brightener or cleaner to my deck?
Applying a brightener or cleaner is recommended to enhance the appearance of your deck and remove any remaining stains or discoloration. Choose a product designed for the specific needs of your deck and follow the instructions for application. Refer to Section 6 for more information on deck brightening and cleaning.
How can I protect surrounding areas during the staining process?
Staining can be messy, so it’s important to take precautions to protect surrounding areas. Cover plants, furniture, and other vulnerable elements near your deck with plastic tarps or drop cloths. This prevents accidental staining. Section 7 offers tips on protecting surrounding areas during the staining process.
What factors should I consider when choosing a deck stain?
When selecting a deck stain, consider factors such as the type of wood, desired color, and level of protection against UV rays and water damage. Refer to Section 8 for guidance on choosing the right stain for your deck and information on different application methods.
After following all the steps, is my deck ready for staining?
Yes, by following the steps outlined in this guide, your deck will be properly prepped and ready for staining. Taking the time to clean, repair, and protect your deck ensures a beautiful and long-lasting finish. Enjoy your revitalized outdoor space! For additional tips and guidance, refer to the sections above.