If you’re considering repainting your old and weathered deck, you might be wondering how professionals achieve a long-lasting and vibrant finish. The secret lies in their techniques and attention to detail.
In this guide, we’ll explore the step-by-step process professionals follow to ensure your deck looks as good as new and lasts for years to come.
Key Takeaways:
- Repainting a wood deck requires professional techniques and attention to detail
- Proper assessment of the deck’s wood surface condition is crucial before starting any repainting project
- Thorough cleaning and preparation of the deck surface ensure a professional-quality paint job
- The right selection of paint and supplies is essential for a long-lasting and vibrant finish
- Proper application techniques, such as using a brush, roller, or sprayer, create a smooth and consistent coat of paint
Assessing the Condition of Your Deck
 Before you begin repainting your deck, it’s essential to assess its current condition thoroughly. Follow these steps to determine if your deck needs repairs before painting:
- Check for structural issues: Examine the overall structure of your deck to ensure it’s safe and sturdy. Look for any signs of rot, warping of existing paint, or decay, and address those issues before proceeding.
- Inspect for damage: Check for cracks, splinters, or other signs of damage on the surface of your deck. These areas will require repair or replacement before proceeding with the repainting process.
- Look for loose boards and nails: Make sure all boards are secure and that there are no loose nails or screws. Hammer in any protruding nails and tighten screws that have come loose.
- Address any mold or mildew: If you notice any mold or mildew growth on your deck, it’s crucial to address it before repainting. Use a solution of equal parts water and bleach to remove the mold and prevent it from returning.
By taking these steps to assess the condition of your deck, you can identify any issues that need repairing before you begin repainting. This will ensure a solid foundation for the rest of the repainting process, and your finished deck will look as good as new!
Deck Cleaning Preparations
Before deck painting, it is crucial to give it a thorough cleaning. This section will guide you through the essential steps and preparations involved in preparing your deck for a new coat of paint.
Removing Dirt and Debris
The first step in cleaning your deck is to remove any dirt and debris, and exterior paint that has accumulated on the surface. Use a broom or leaf blower to clear the deck of loose leaves, branches, and other debris. Afterward, scrub the deck using a wire scrub brush and a solution of warm water and detergent. Rinse the deck thoroughly with a garden hose.
Addressing Mold and Mildew Growth
Mold and mildew can grow on a deck’s surface, particularly in areas that are shaded and damp. Before painting your deck, it’s important to remove any signs of mold and mildew. You can use a mixture of equal parts vinegar and water to clean mold and mildew stains from your deck. Apply the solution with a sponge or garden sprayer and let it sit for several minutes before rinsing it off with a hose.
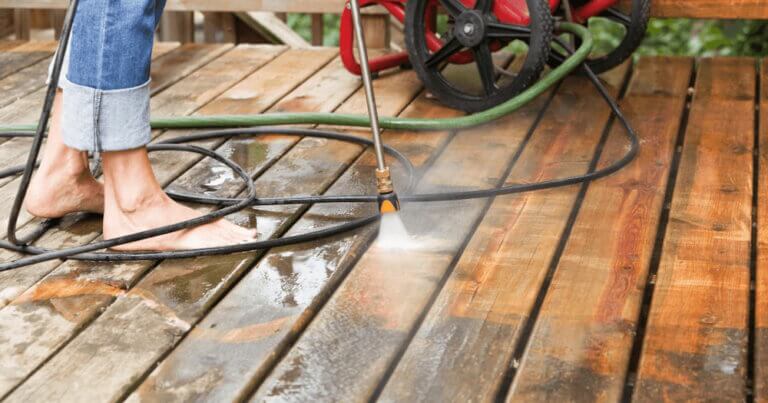
Power Washing
If your deck is particularly dirty or has been neglected for a long time, a power washer can be an effective way to clean the surface. However, be careful while using a power washer, as it can damage the wood if not used correctly. Always wear protective gear while using a power washer and keep the nozzle at least six inches from the deck surface.
Allowing Sufficient Drying Time
After cleaning your deck, it is crucial to give it sufficient time to dry completely. Allow at least two to three days for the deck to dry thoroughly before moving on to the painting process. Avoid painting the deck while it is still damp, as the moisture can cause the paint to bubble and peel.
By following these steps and taking the time to prepare your deck properly, you can achieve a professional-looking finish that lasts for years to come.
Choosing the Right Paint and Supplies
Choosing the right paint and supplies is vital for a professional and durable finish. Here are some tips to help you make the right choice:
Deck Paint Types
When it comes to deck paint, there are three main types: oil-based, water-based, and 100% acrylic. Oil-based paint has been around for years and offers excellent durability, but it takes longer to dry and emits strong fumes. Water-based paint has a quick drying time and is easy to clean up, but it is less durable than oil-based paint. 100% acrylic paint is the most expensive option but also the most durable.
Color Considerations
When choosing a color for your deck, consider the existing color scheme of your house and outdoor space. Most people opt for neutral colors like beige, gray, or taupe, but there’s no harm in choosing a bold and vibrant color to liven up your deck!
Essential Tools and Materials
| Tools | Materials |
| Paint brushes in various sizes | Primer |
| Paint roller brushes with covers | Paint |
| Paint sprayer | Cleaner for deck surface |
| Painter’s tape | Sandpaper (60- to 80-grit) |
| Paint tray | Masking tape or plastic sheeting |
Pro Tip: Don’t skimp on quality when it comes to paint and supplies. Choosing cheaper options can lead to a less durable finish and may require more frequent repainting.
By selecting the right paint type, color, and essential tools and materials, you’ll be well on your way to achieving a professional and long-lasting finish on your repainted deck!
Sanding and Smoothing the Surface
Before applying a new coat of paint, it’s essential to sand and smooth the deck’s surface to ensure the best results. Here’s a step-by-step guide to help you achieve this:
- Start by cleaning the deck thoroughly, removing any debris or peeling paint using a wire brush and a paint scraper.
- Using a belt sander or orbital sander fitted with coarse grit sandpaper (around 60-grit), sand all over the deck’s surface to remove any roughness or splinters.
- Go over the deck with finer grit sandpaper (around 100-grit) to achieve a smooth, even surface.
- Use a sanding sponge or sandpaper to get into any hard-to-reach areas or corners.
- After the sanding process, use a tack cloth to wipe away any dust from the surface thoroughly.
It’s essential to be careful while sanding to avoid damaging the wood. A belt sander is efficient, but it’s more aggressive and can cause grooves or dips in the wood if used incorrectly. An orbital sander is a better option for most homeowners, as it’s more forgiving and easier to control.
Pro Tip: If you’re sanding a large deck, consider renting a floor sander to save time and effort.
If your deck has an existing stain or paint, you’ll need to remove it before sanding. Use a paint stripper and follow the instructions carefully to avoid damaging the wood.
Sanding helps improve the deck’s appearance and smooth out any defects, but it’s not enough on its own. You’ll need to use a wood filler to fix any cracks, gouges, or other imperfections. Use a putty knife to apply the filler and let it dry according to the manufacturer’s instructions. After the filler dries, sand the patched areas with fine-grit sandpaper again to create a smooth surface.
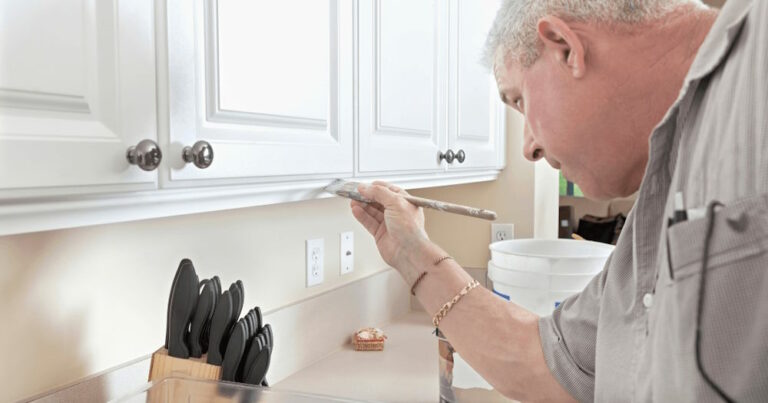
Primer Application and Deck Repairs
Before you start painting your deck, it’s crucial to have a strong foundation to work on. Applying a high-quality primer helps ensure the longevity of your new coat of paint and prevents it from chipping or peeling off. Here are the steps for proper primer application:
- Clean the deck thoroughly: Make sure the surface is free of dirt, dust, and debris before applying primer.
- Inspect and prepare for repairs: Check for any cracks, splinters, or nail holes. Fix any damages with an appropriate wood filler or putty, sand it down, and then dust it off.
- Choose the right primer: Select a high-quality primer that matches the type of paint you will be using.
- Apply the primer: Use a brush or roller to apply a thin, even coat of primer on the deck surface. Make sure the primer is fully dry before proceeding with the paint application process. Follow the manufacturer’s instructions for drying time.
Deck repairs are also essential before you start painting. Inspect the deck for any loose boards, nails, or screws that need tightening. Replace any damaged boards or railings to ensure the safety and longevity of your deck.
Paint Application Techniques
Once your deck is prepped and ready, it’s time to apply the paint. Here are some professional techniques to achieve a smooth and consistent coat.
Brush Application
Brush application is a classic method for painting decks. It allows for greater precision in tight spots or on intricate designs. When using a brush, keep a bucket of paint nearby and apply it in long, even strokes. Work from the farthest point of the deck towards the exit to avoid stepping in wet paint and creating footprints.
Roller Application
A roller is the fastest and most efficient way to apply paint on large deck surfaces. It’s best to use a paint pan to hold the paint and a sturdy roller to apply it. Start at the edges of the deck, near the railing, and work towards the center. Roll in the same direction as the wood grain for a smooth appearance.
Sprayer Application
Sprayer application is the quickest method to paint a deck, but it requires more skill and experience than brush or roller application. Use a high-volume, low-pressure sprayer, and apply the paint in a sweeping motion while maintaining a consistent distance from the deck surface. Cover nearby areas and plants with drop cloths to avoid overspray.
Clean Up
After painting, clean up all tools and equipment immediately. Store paint brushes in their original packaging or wrap them in plastic wrap to prevent them from drying up. Don’t forget to dispose of paint cans and other hazardous materials according to local regulations.
Drying and Curing Time
After you’ve applied the final coat of paint to your deck, it’s important to allow adequate drying time before using it. Drying and curing time can vary depending on the type of paint you use, the weather conditions, and the humidity levels. On average, you should allow at least 24-48 hours of drying time before walking on your deck or replacing furniture.
It’s essential to understand the difference between drying time and curing time. Drying time refers to the amount of time it takes for the solvent or water to evaporate from the paint. Curing time refers to the length of time it takes for the paint to reach its maximum hardness and durability.
Latex and water-based paints generally have a faster drying time, but they take longer to cure completely. On the other hand, oil-based paints take longer to dry but cure faster. Depending on the type of paint you use, curing time can range from a couple of days to a few weeks.
Protecting Your Deck During Drying and Curing Time
During the drying and curing process, it’s crucial to protect your deck from excess moisture or dirt that can ruin the finish. Avoid using any cleaning chemicals or pressure washers on the newly painted surface, as they can remove the paint or cause discoloration.
If possible, cover your deck with a tarp or other protective covering to shield it from the elements. Also, avoid dragging or placing heavy furniture on the freshly painted surface to prevent any denting or scratching.
Testing for Dryness and Curing
To ensure that your deck is fully dry and cured before using it, you can perform a simple test. Press your fingernail gently into an inconspicuous area of the painted surface. If the surface appears solid and doesn’t leave a mark, it’s likely fully cured. If the surface feels tacky or leaves a slight imprint, it needs more time to dry and cure.
Enhancing Your Deck’s Aesthetics
Your newly repainted deck can be more than just a functional space; it can also be a visually stunning addition to your home. Here are some ideas to help you elevate your deck’s aesthetic appeal:
Add Plants and Flowers
There’s no better way to bring life to your deck than to add some plants and flowers. Consider incorporating potted plants with vibrant blooms in various sizes and colors. You can also hang flower baskets from the railings or install a trellis for climbing plants like ivy or jasmine.
Install Outdoor Lighting
Outdoor lighting can transform your deck into a magical space for evening gatherings with friends and family. Consider installing string lights or lanterns for a warm and cozy atmosphere. You can also invest in solar-powered lighting fixtures for a more eco-friendly option.
Add Decorative Elements
Personalize your deck by adding decorative elements such as outdoor rugs, throw pillows, and artwork or sculptures. Make sure to choose items that are weather-resistant so that they can withstand the elements.
| Decorative Elements | Benefits |
| Outdoor Rugs | Adds color and texture to the deck, protects and defines the seating area. |
| Throw Pillows | Provides comfort and style, and adds pops of color to the deck. |
| Artwork or Sculptures | Brings personality and character to the deck, transforms it into a unique outdoor space. |
Add Outdoor Furniture
Invest in comfortable and stylish outdoor furniture to create the ultimate lounging and dining area on your deck. There are many options available, from classic dining sets to cozy lounge chairs, so choose pieces that match your preferred style and functional needs.
Paint or Stain the Deck Railing
Consider painting or staining your deck railing to add a pop of color and create an eye-catching visual contrast against the deck’s main color. Make sure to choose a shade that complements the color of your deck.
With these ideas, you can turn your newly repainted deck into an outdoor living space that reflects your style and personality. Have fun experimenting and creating a space that you’ll enjoy for years to come!
Conclusion

Repainting a deck like a professional takes time and effort, but the results are worth it. By carefully assessing your deck’s condition, thoroughly cleaning it, and selecting the right paint and supplies, you can achieve a beautifully repainted deck that lasts for years.
Remember, proper preparation is key. Sanding and smoothing the surface, applying primer, and addressing any repairs or cracks are crucial steps to ensure a long-lasting paint job.
Are you ready to upgrade your existing deck? Give your home brand new look and let Canyon Painting do the job for you! Call us today for an estimate.